Documenting your API is essential if you want others to consume it. API documentation should list the accessible endpoints (URL, method), their parameters, and the expected responses (HTTP status code, body). It should be readable by both humans and computers - the latter being especially useful for generating clients automatically.
OpenAPI Specification is the most common way to document an API:
The OpenAPI Specification (OAS) defines a standard, language-agnostic interface to RESTful APIs which allows both humans and computers to discover and understand the capabilities of the service without access to source code, documentation, or through network traffic inspection. When properly defined, a consumer can understand and interact with the remote service with a minimal amount of implementation logic.
An OpenAPI definition can then be used by documentation generation tools to display the API, code generation tools to generate servers and clients in various programming languages, testing tools, and many other use cases.
#How to add Swagger to your ASP.NET Core Web API
The idea is to generate the documentation from the code and the XML comments. So, first, you need to generate the XML documentation during the build. Then, add the package Swashbuckle.AspNetCore and configure it.
Go to the project settings and check XML documentation file:
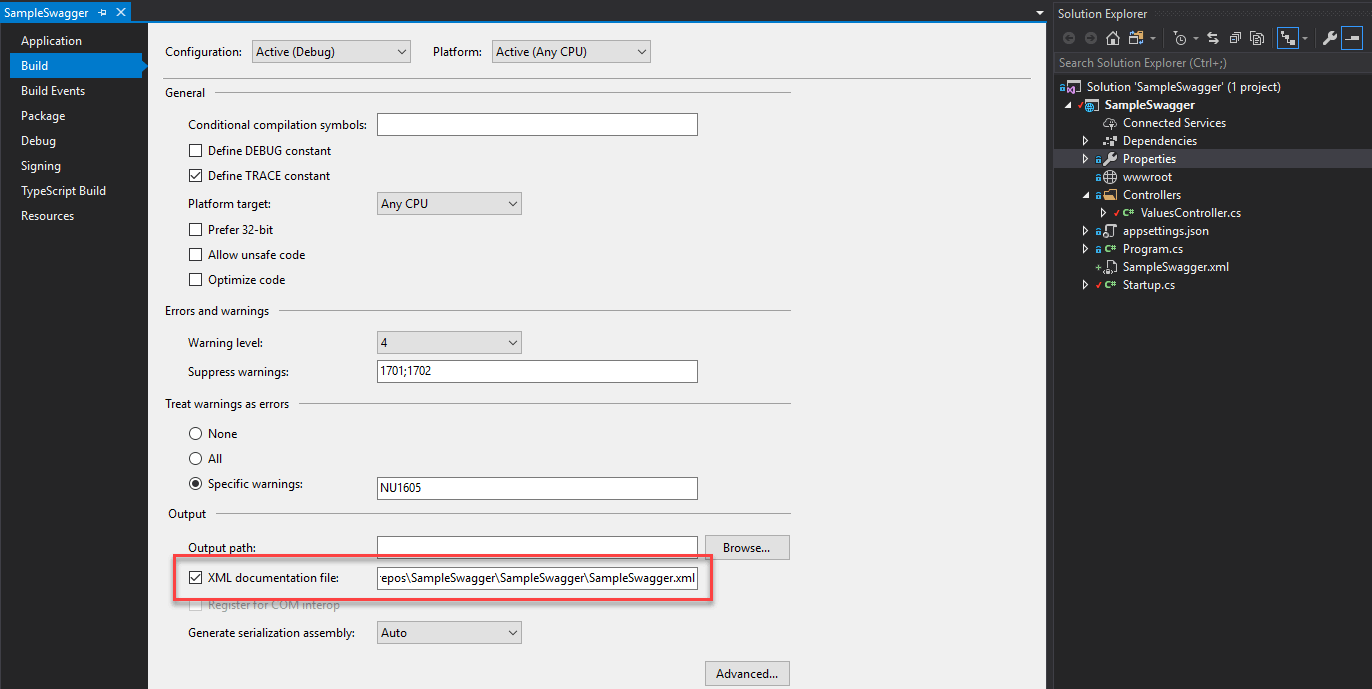 Enable XML Documentation in Visual Studio
Or you can set it in the csproj file:
csproj (MSBuild project file)
<PropertyGroup>
    <GenerateDocumentationFile>true</GenerateDocumentationFile>
</PropertyGroup>
Add NuGet package Swashbuckle.AspNetCore (NuGet, GitHub)
Edit the Startup.cs file to register Swagger:
C#
public void ConfigureServices(IServiceCollection services)
{
    services.AddMvc().SetCompatibilityVersion(CompatibilityVersion.Version_2_1);

    // Configure Swagger
    services.AddSwaggerGen(c =>
    {
        c.SwaggerDoc("v1", new Info
        {
            Title = "Swagger Sample",
            Version = "v1",
            // You can also set Description, Contact, License, TOS...
        });

        // Configure Swagger to use the xml documentation file
        var xmlFile = Path.ChangeExtension(typeof(Startup).Assembly.Location, ".xml");
        c.IncludeXmlComments(xmlFile);
    });
}

public void Configure(IApplicationBuilder app, IHostingEnvironment env)
{
    if (env.IsDevelopment())
    {
        app.UseDeveloperExceptionPage();
    }

    app.UseMvc();

    app.UseSwagger();
    app.UseSwaggerUI(c =>
    {
        c.SwaggerEndpoint("/swagger/v1/swagger.json", "Swagger Sample");
    });
}
Add an API controller
C#
[Route("api/[controller]")]
[ApiController]
public class GistController : ControllerBase
{
    /// <summary>
    /// List all public gists sorted by most recently updated to least recently updated.
    /// </summary>
    /// <remarks>With pagination, you can fetch up to 3000 gists. For example, you can fetch 100 pages with 30 gists per page or 30 pages with 100 gists per page.</remarks>
    [HttpGet]
    public ActionResult<IEnumerable<Gist>> Get()
    {
        // code omitted from brevity
    }

    /// <summary>
    /// Get a single gist.
    /// </summary>
    /// <param name="id">The id of the gist</param>
    [HttpGet("{id}")]
    public ActionResult<Gist> Get(int id)
    {
        // code omitted from brevity
    }
}
You can enrich your controller actions with additional information. In XML doc comments you can set:
<summary></summary>: Description of the action<remarks></remarks>: Additional information or sample<returns></returns>: Description of the return value<param name="id"></param>: Description of an input parameter<response code="201"></response>: Description of the return value when the status code is 201
You can also add some C# attributes such as [ProducesResponseType] which allows specifying the model of a response for a status code.
C#
[ProducesResponseType(201, Type = typeof(Gist))]
[ProducesResponseType(400, Type = typeof(void))]
public ActionResult Get(int id)
{
    // code omitted from brevity
}
Of course, you can also add attributes and XML comments to describe your models:
C#
public class Gist
{
    /// <summary>The description of the Gist</summary>
    [Required]
    public string Description { get; set; }

    /// <summary>Indicate whether the gist is public or private</summary>
    [DefaultValue(true)]
    public bool Public { get; set; }
}
If your API requires a specific header or an authentication mechanism, you can declare them in the startup.cs file:
C#
services.AddSwaggerGen(c =>
{
    c.SwaggerDoc("v1", new Info
    {
        Title = "Swagger Sample",
        Version = "v1",
    });

    c.AddSecurityDefinition("Bearer", new ApiKeyScheme { In = "header", Description = "Please enter JWT with Bearer into field", Name = "Authorization", Type = "apiKey" });
    c.AddSecurityRequirement(new Dictionary<string, IEnumerable<string>>
    {
        { "Bearer", Enumerable.Empty<string>() },
    });
});
The Generated UI and JSON will reflect all these comments and attributes, so the consumer of your API will know exactly how they should interact with it.
#Open the Swagger UI
You can now access the generated swagger UI by navigating to http://<host>/swagger/
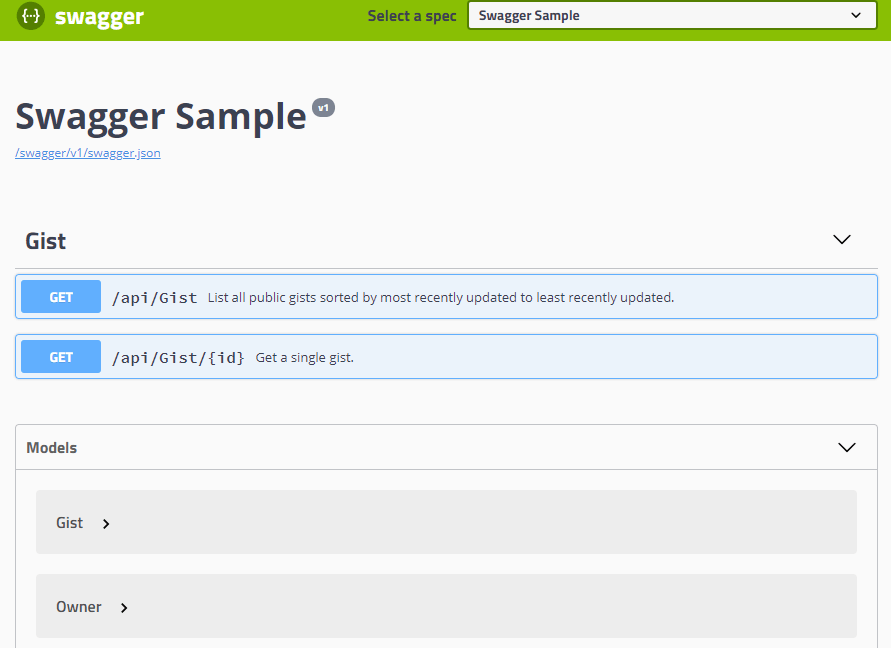 Swagger UI - List of endpoints
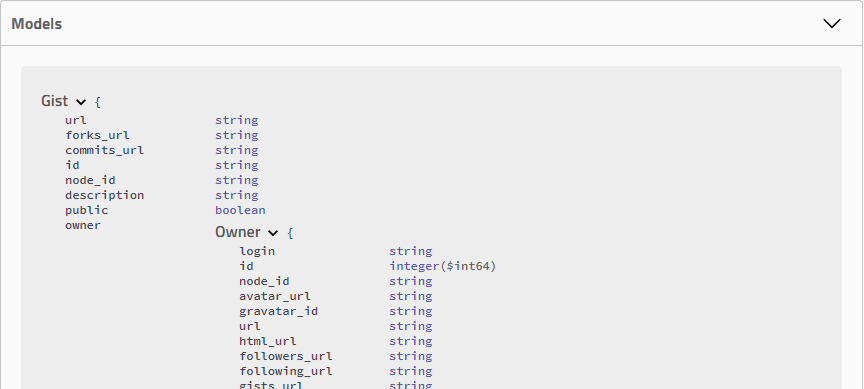 Swagger UI - List of models
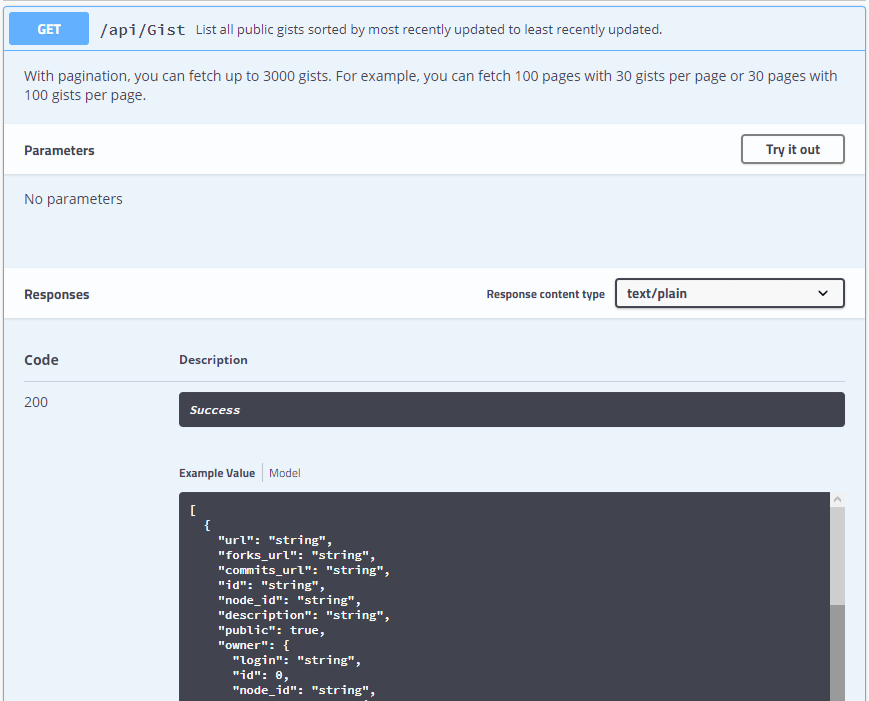 Swagger UI - Details of an endpoint
You can even try your API by clicking on Try it out.
#Conclusion
You can add documentation to your API in a standard way in just a few minutes. The default UI may not be the most visually impressive, but it is very convenient. It also enables your users to generate an SDK using swagger Codegen.
Do you have a question or a suggestion about this post? Contact me!