xUnit.net is a free, open-source, community-focused unit testing tool for the .NET Framework. Written by the original inventor of NUnit v2, xUnit.net is the latest technology for unit testing C#, F#, VB.NET, and other .NET languages. xUnit.net gained significant popularity when Microsoft adopted it for CoreFX and ASP.NET Core. It is also the test framework I use on most of my projects. This post provides an overview of what the framework offers.
#Setting up a test project and run tests
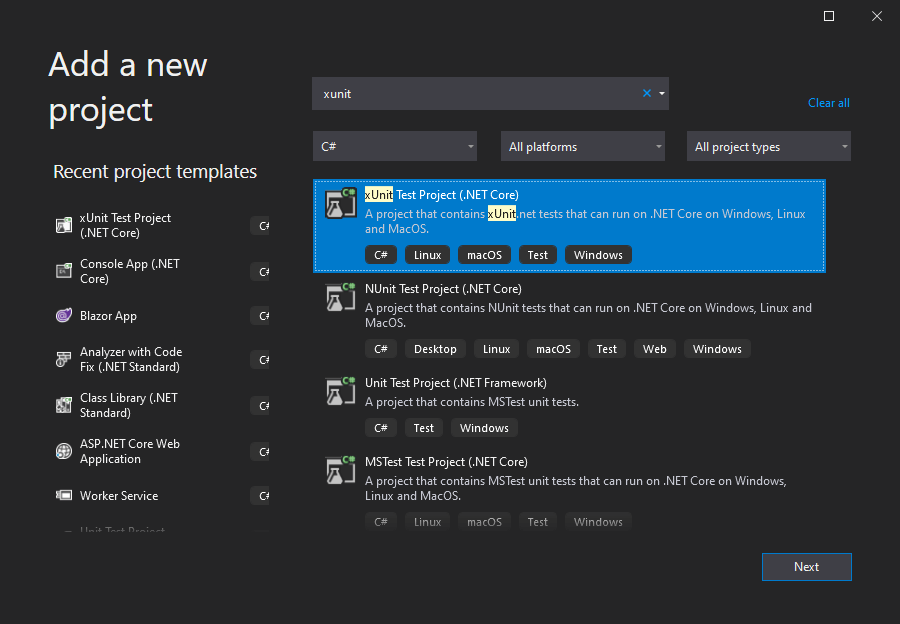
You can create a new xUnit project using the command line:
Shell
dotnet new xunit
Or using Visual Studio:
The csproj should look like:
csproj (MSBuild project file)
<Project Sdk="Microsoft.NET.Sdk">
  <PropertyGroup>
    <TargetFramework>netcoreapp3.1</TargetFramework>
  </PropertyGroup>
  <ItemGroup>
    <PackageReference Include="Microsoft.NET.Test.Sdk" Version="16.6.1" />
    <PackageReference Include="xunit" Version="2.4.1" />
    <PackageReference Include="xunit.runner.visualstudio" Version="2.4.1" />
  </ItemGroup>
</Project>
Now you can create your first test:
C#
using Xunit;

public class UnitTest1
{
    [Fact]
    public void Test1()
    {
        var sum = 18 + 24;
        Assert.Equal(42, sum);
    }
}
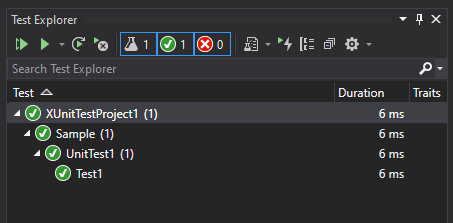
If everything is set up correctly, you should see the passing test in the Test Explorer:
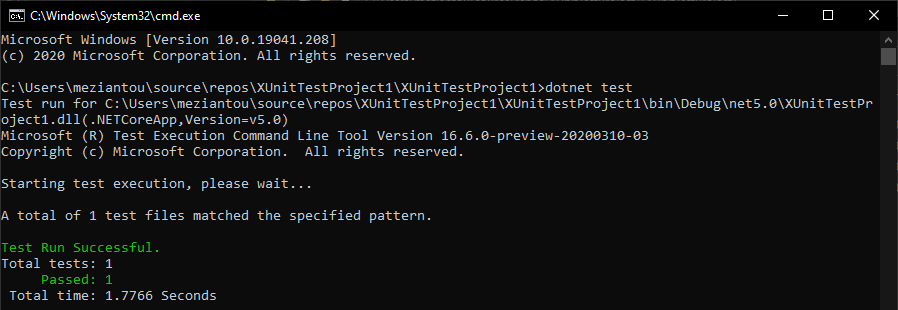
You can also use the command line:
Shell
dotnet test
#Exploring asserts
The only class you need to know is Xunit.Assert. This class supports comparing values, strings, collections, exceptions, and events. Here are a few examples:
C#
// Any values
int value = 0;
Assert.Equal(42, value);
Assert.NotEqual(42, value);

// Boolean
bool b = true;
Assert.True(b, "b should be true");
Assert.False(b, "b should be false");

// Strings
var str = "";
Assert.Equal("", str, ignoreCase: false, ignoreLineEndingDifferences: false, ignoreWhiteSpaceDifferences: false);
Assert.StartsWith("prefix", str, StringComparison.Ordinal);
Assert.EndsWith("suffix", str, StringComparison.Ordinal);
Assert.Matches("[0-9]+", str);

// Collections
var collection = new [] { 1, 2, 3 };
Assert.Empty(collection);
Assert.NotEmpty(collection);
Assert.Single(collection); // Contains only 1 item
Assert.Single(collection, item => item == 1); // Contains only 1 item
Assert.Equal(new int[] { 1, 2, 3 }, collection);
Assert.Contains(0, collection);
Assert.Contains(collection, item => item == 1);

// Assert each items of the collection match the condition
Assert.All(collection, item => Assert.InRange(item, low: 0, high: 10));

// Assert the collection contains 3 items and the items match the conditions (in the declared order)
Assert.Collection(collection,
                item => Assert.Equal(1, item),
                item => Assert.Equal(2, item),
                item => Assert.Equal(3, item));

// Exceptions
var ex1 = Assert.Throws<Exception>(() => Console.WriteLine()); // Return the thrown exception
var ex2 = await Assert.ThrowsAsync<Exception>(() => Task.FromResult(1)); // Return the thrown exception
Assert.Equal("message", ex1.Message);

// Events
var test = new Test();
Assert.Raises<EventArgs>(
    handler => test.MyEvent += handler,
    handler => test.MyEvent -= handler,
    () => test.RaiseEvent());
#Creating parameterized tests in xUnit
xUnit allows you to write a test and exercise it with multiple data sets using a Theory. You can provide data via an attribute, a method, a class, or a custom attribute.
C#
public class UnitTest1
{
    // You can mix multiple data sources
    // xUnit provides an analyzer to ensure the data sources are valid for the test
    [Theory]
    [InlineData(1, 2, 3)]              // InlineData works for constant values
    [MemberData(nameof(Test1Data))]    // MemberData can be a public static method or property
    [ClassData(typeof(TestDataClass))] // TestDataClass must implement IEnumerable<object[]>
    [CustomDataAttribute]              // Any attribute that inherits from DataAttribute
    public void Test1(int a, int b, int expected)
    {
        Assert.Equal(expected, a + b);
    }

    // The method can return IEnumerable<object[]>
    // You can use TheoryData to strongly type the result
    public static TheoryData<int, int, int> Test1Data()
    {
        var data = new TheoryData<int, int, int>();
        data.Add(18, 24, 42);
        data.Add(6, 7, 13);
        return data;
    }

    public class TestDataClass : IEnumerable<object[]>
    {
        public IEnumerator<object[]> GetEnumerator()
        {
            yield return new object[] { 9, 1, 10 };
            yield return new object[] { 9, 10, 19 };
        }

        IEnumerator IEnumerable.GetEnumerator() => GetEnumerator();
    }

    private class CustomDataAttribute : DataAttribute
    {
        public override IEnumerable<object[]> GetData(MethodInfo testMethod)
        {
            yield return new object[] { 2, 3, 4 };
        }
    }
}
#Setting up / Tearing down tests
xUnit instantiates one instance of the class per test. This means you can use the constructor to set up tests. xUnit calls Dispose after each test if the class implements IDisposable. Since xUnit creates one instance per test, state is not shared between tests.
C#
// The class is instantiated once per test
// This means the constructor/Dispose are called once per test
public class UnitTest1 : IDisposable, IAsyncLifetime
{
    public UnitTest1()
    {
        // Set up (called once per test)
    }

    public void Dispose()
    {
        // Tear down (called once per test)
    }

    public Task InitializeAsync()
    {
        // Async set up (called once per test)
    }

    public Task DisposeAsync()
    {
        // Async Tear down (called once per test)
    }

    [Fact]
    public void Test1()
    {
        // Test
    }

    [Fact]
    public void Test2()
    {
        // Test
    }
}
#Sharing data between tests
xUnit.net provides a way to think about per-fixture data with the use of the IClassFixture<T> and ICollectionFixture<T> interfaces. xUnit will create a single instance of the fixture data and pass it through to your constructor before running each test. All the tests share the same instance of fixture data. After all the tests have run, the runner will dispose of the fixture data, if it implements IDisposable.
C#
public class MyFixture : IDisposable, IAsyncLifetime
{
    public MyFixture()
    {
        // Called once before running all tests in UnitTest1
    }

    public void Dispose()
    {
        // Called once after running all tests in UnitTest1
    }

    public Task InitializeAsync()
    {
        // Called once before running all tests in UnitTest1
    }

    public Task DisposeAsync()
    {
        // Called once after running all tests in UnitTest1
    }
}

public class UnitTest1 : IClassFixture<MyFixture>
{
    private readonly MyFixture _fixture;

    // All the tests share the same instance of MyFixture
    public UnitTest1(MyFixture fixture)
    {
        _fixture = fixture;
    }

    [Fact]
    public void Test1()
    {
    }

    [Fact]
    public void Test2()
    {
    }
}
You can share data between classes using the concept of collections (see the next section for more information).
C#
public class MyFixture : IDisposable, IAsyncLifetime
{
    public MyFixture()
    {
        // Called once before running all tests in the collection #1
    }

    public void Dispose()
    {
        // Called once after running all tests in the collection #1
    }

    public Task InitializeAsync()
    {
        // Called once before running all tests in the collection #1
    }

    public Task DisposeAsync()
    {
        // Called once after running all tests in the collection #1
    }
}

// Define the collection with the fixture
[CollectionDefinition("Collection #1")]
public class Collection1Class : ICollectionFixture<MyFixture> { }

// Declare test in the defined collection
[Collection("Collection #1")]
public class UnitTest1
{
    private readonly MyFixture _fixture;

    public UnitTest1(MyFixture fixture)
    {
        _fixture = fixture;
    }

    [Fact]
    public void Test1()
    {
    }
}

[Collection("Collection #1")]
public class UnitTest2
{
    private readonly MyFixture _fixture;

    public UnitTest2(MyFixture fixture)
    {
        _fixture = fixture;
    }

    [Fact]
    public void Test2()
    {
    }
}
More information: https://xunit.net/docs/shared-context#constructor
#Executing tests in parallel
By default, xUnit runs test collections in parallel and creates 1 test collection per class.
C#
// Test1 and Test2 runs sequentially => Runs in 10s
// Test3 and Test4 runs sequentially => Runs in 10s
// (Test1, Test2) runs in parallel with (Test3, Test4) => Runs in 10s
public class UnitTest1
{
    [Fact]
    public async Task Test1() => await Task.Delay(5000);

    [Fact]
    public async Task Test2() => await Task.Delay(5000);
}

public class UnitTest2
{
    [Fact]
    public void Test3() => Thread.Sleep(5000);

    [Fact]
    public void Test4() => Thread.Sleep(5000);
}
You can create your own collection to group tests using the [Collection("name")] attribute:
C#
// Test1 Test2, Test3, Test4 run sequentially because there are in the same collection
// => Runs in 20s
[Collection("Collection #1")]
public class UnitTest1
{
    [Fact]
    public async Task Test1() => await Task.Delay(5000);

    [Fact]
    public async Task Test2() => await Task.Delay(5000);
}

[Collection("Collection #1")]
public class UnitTest2
{
    [Fact]
    public void Test3() => Thread.Sleep(5000);

    [Fact]
    public void Test4() => Thread.Sleep(5000);
}
You can control the parallelization using the CollectionBehaviorAttribute:
C#
[assembly: Xunit.CollectionBehaviorAttribute(
                    CollectionBehavior.CollectionPerAssembly,
                    DisableTestParallelization = false,
                    MaxParallelThreads = 4)]
You can turn off parallelism for specific Test Collection. Parallel-capable test collections will be run first (in parallel), followed by parallel-disabled test collections (run sequentially).
C#
[CollectionDefinition("Collection #1", DisableParallelization = true)]
public class Collection1Class { }

[Collection("Collection #1")]
public class UnitTest1
{
    [Fact]
    public void Test1()
    {
    }
}
More information: https://xunit.net/docs/running-tests-in-parallel
#Categorizing tests / Running a subset of the tests
Traits add metadata to a test as a list of key/value pairs. You can set a trait at the class level or the test level:
C#
[Trait("Area", "API")]
public class UnitTest1
{
    [Fact]
    [Trait("Category", "Integration")]
    [Trait("Issue", "123")]
    public void Test1()
    {
    }
}
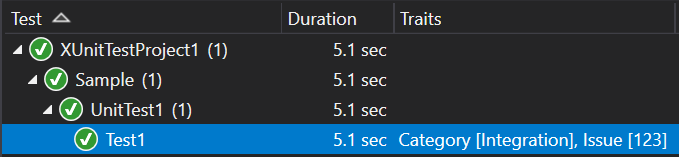
You can see the list of traits in the Visual Studio Test Explorer:
You should create constants to define traits in your project:
C#
internal static class Traits
{
    public const string Category = "Category";

    public static class Categories
    {
        public const string Integration = "Integration";
    }
}

public class UnitTest1
{
    [Fact]
    [Trait(Traits.Category, Traits.Categories.Integration)]
    public void Test1()
    {
    }
}
To avoid repetition, you can create a custom attribute to define traits:
C#
[TraitDiscoverer("Sample.FunctionalTestDiscoverer", "XUnitTestProject1")]
[AttributeUsage(AttributeTargets.Method | AttributeTargets.Class)]
public sealed class FunctionalTestAttribute : Attribute, ITraitAttribute
{
}

public sealed class FunctionalTestDiscoverer : ITraitDiscoverer
{
    public IEnumerable<KeyValuePair<string, string>> GetTraits(IAttributeInfo traitAttribute)
    {
        yield return new KeyValuePair<string, string>("Category", "Integration");
    }
}

public class UnitTest1
{
    [Fact]
    [FunctionalTest] // Equivalent of [Trait("Category", "Integration")]
    public void Test1()
    {
    }
}
The most interesting part of defining traits is that it allows you to run only a subset of the tests:
Shell
dotnet test --filter "Area=API"
dotnet test --filter "Area=API&Category!=Integration"
More information:
#Capturing test output
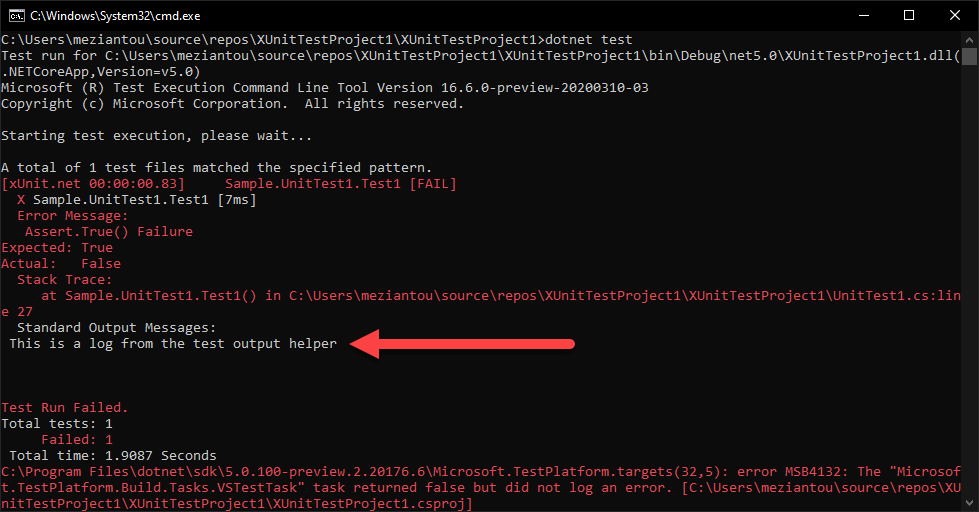
To log diagnostic data during a test, inject the ITestOutputHelper interface. Log anything useful to diagnose failing tests, especially when tests run on a remote machine such as a CI server.
C#
public class UnitTest1
{
    private readonly ITestOutputHelper _output;

    public UnitTest1(ITestOutputHelper testOutputHelper)
    {
        _output = testOutputHelper;
    }

    [Fact]
    public void Test1()
    {
        _output.WriteLine("This is a log from the test output helper");
    }
}
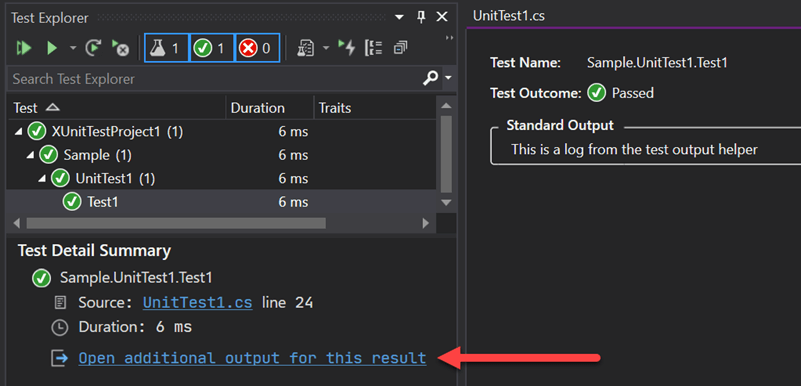
When a test fails, the output is written to the console.
More information: https://xunit.net/docs/capturing-output.html
#Skipping tests
You sometimes need to skip some tests. For instance, if you have a flaky test, you can disable it until you fix it.
C#
[Fact(Skip = "This test is disabled")]
public void Test1()
{
}
However, there is no way to dynamically skip a test. What you can do is to create a custom attribute:
C#
public class UnitTest1
{
    [IgnoreOnWindowsFactAttribute]
    public void Test1()
    {
    }
}

public sealed class IgnoreOnWindowsFactAttribute : FactAttribute
{
    public IgnoreOnWindowsFactAttribute()
    {
        if (RuntimeInformation.IsOSPlatform(OSPlatform.Windows))
        {
            Skip = "Ignored on Windows";
        }
    }
}
#Testing against multiple frameworks
You can run the test against multiple frameworks by multi-targeting the test project:
csproj (MSBuild project file)
<Project Sdk="Microsoft.NET.Sdk">
  <PropertyGroup>
    <TargetFrameworks>net461;netcoreapp3.1;net5.0</TargetFrameworks>
  </PropertyGroup>

  ...

</Project>
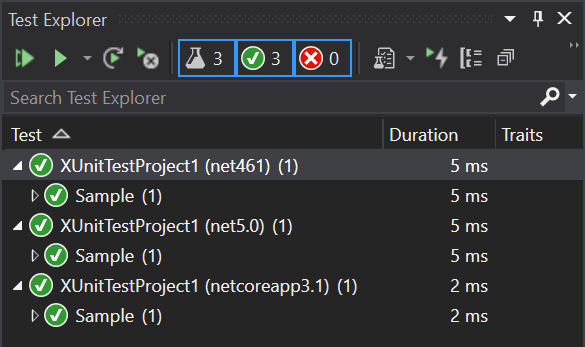
Running dotnet test executes tests on each target framework, or you can specify one:
Shell
dotnet test
dotnet test --framework net461
#Changing the display name of the tests
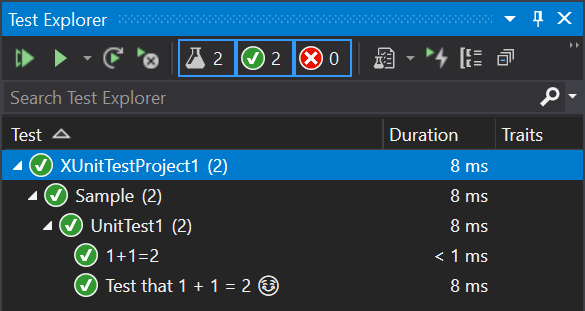
By default, xUnit uses the name of the method as the display name. You can change this behavior by using the DisplayName property:
C#
[Fact(DisplayName = "1 + 1 = 2")]
public void Test_that_1_plus_1_eq_2()
{
    Assert.Equal(2, 1 + 1);
}
You can also create a file named xunit.runner.json at the root of the test project and set the methodDisplay options:
JSON
{
  "$schema": "https://xunit.net/schema/current/xunit.runner.schema.json",
  "methodDisplay": "method",
  "methodDisplayOptions": "replaceUnderscoreWithSpace,useOperatorMonikers,useEscapeSequences,replacePeriodWithComma"
}
Using this file, the following method name Test_that_1_X2B_1_eq_3_U263A is displayed as Test that 1 + 1 = 3 ☺.
#Ordering execution of test collections/test cases
By default, xUnit does not order test collections or test case execution, so they run in random order. To execute them in a specific order, implement ITestCollectionOrderer and ITestCaseOrderer to customize the execution order.
C#
[assembly: TestCollectionOrderer("Sample.CustomTestCollectionOrderer", "XUnitTestProject1")]
[assembly: TestCaseOrderer("Sample.CustomTestCaseOrderer", "XUnitTestProject1")]

namespace Sample
{
    public class CustomTestCollectionOrderer : ITestCollectionOrderer
    {
        public IEnumerable<ITestCollection> OrderTestCollections(IEnumerable<ITestCollection> testCollections)
        {
            return testCollections.OrderByDescending(collection => collection.DisplayName);
        }
    }

    public class CustomTestCaseOrderer : ITestCaseOrderer
    {
        public IEnumerable<TTestCase> OrderTestCases<TTestCase>(IEnumerable<TTestCase> testCases)
            where TTestCase : ITestCase
        {
            return testCases.OrderByDescending(test => test.DisplayName);
        }
    }

    public class UnitTest1
    {
        [Fact]
        public void Test2() => Thread.Sleep(5000);

        [Fact]
        public void Test1() => Thread.Sleep(5000);
    }

    // The attribute can also be set on the test collection
    [TestCaseOrderer("Sample.CustomTestCaseOrderer", "XUnitTestProject1")]
    public class UnitTest2
    {
        [Fact]
        public void Test3() => Thread.Sleep(5000);
        [Fact]
        public void Test4() => Thread.Sleep(5000);
    }
}
xUnit has more integration points for advanced scenarios. See the comprehensive xUnit documentation for more information: https://xunit.net!
Do you have a question or a suggestion about this post? Contact me!