In C#, a regex is just a string. When the pattern is not simple, it can be hard to understand it. Visual Studio 2019 comes with some improvements to help you working with regexes.
#Regex are colorized
Each part of the pattern is colorized. It's easy to distinguish special characters, groups, quantifiers, comments, etc.:

The colorization depends on the regex options:

#Autocompletion works inside the pattern string
IntelliSense helps you to write the regex pattern. It's helpful to discover the syntax or to autocomplete character categories:


#Matching parentheses are highlighted
To quickly find where the group starts or ends, Visual Studio highlight the matching parentheses:

#Backreferences are highlighted
When you see a backreference in the pattern, it is not easy to find the referenced group, especially for numbered backreferences. To quickly identify the referenced group, Visual Studio highlights it when your cursor is on a backreference:

#Errors in the pattern are reported
If the pattern is not valid, you'll get an error at runtime. What you want is to detect errors as soon as possible. Visual Studio reports errors in the pattern, so you can fix it:

#Colorizing any string
Visual Studio automatically detects the string used in Regex methods (Regex constructor or static methods). But you may need to construct a string with the pattern before using it in a Regex method. You can instruct Visual Studio to consider any string as a regex pattern using a comment. You can also set the regex options in the comment.
The comment can be just before the string using /* language=regex */ or on the preceding line using // language=regex. Use a comma to add the regex options.

You can use the StringSyntax attribute to specify the expected language for a parameter:
C#
bool IsMatch(string value, [StringSyntax(StringSyntaxAttribute.Regex)] string regexPattern)
    => Regex.IsMatch(value, regexPattern);

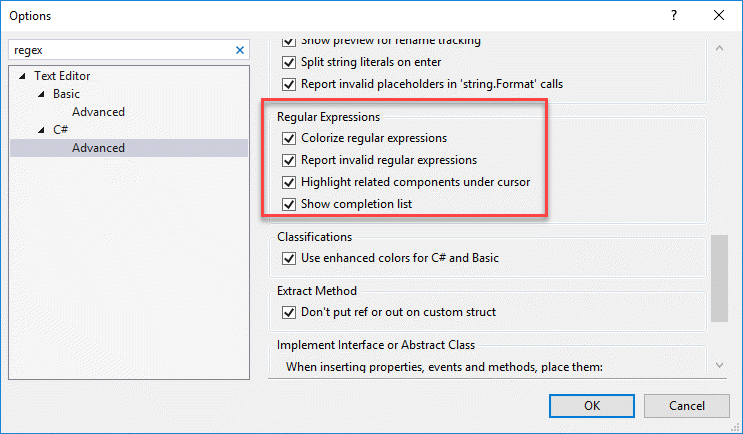
#Check your Visual Studio settings
If the above functionalities don't work, check your Visual Studio settings:

This post is part of the series 'Visual Studio Tips and Tricks'. Be sure to check out the rest of the blog posts of the series!
Do you have a question or a suggestion about this post? Contact me!