This post is part of the series 'Web Performance'. Be sure to check out the rest of the blog posts of the series!
In the previous post, I wrote about why performance is important and how to measure it for your website. In this post, I'll cover the various things I did on this website to improve performance. Some optimizations are just configuration flags to turn on; others require more changes to your code.
#Enable HTTP/2
HTTP/2 is an evolution of HTTP/1 which comes with new features to improve page load speed in web browsers. HTTP/2 is supported by all major browsers (source). Here are some functionalities:
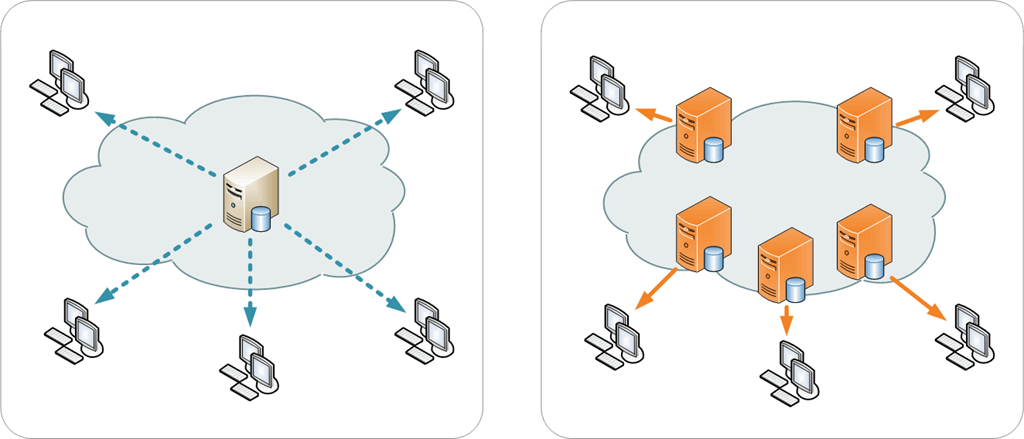
- Multiplexing multiple requests over a single TCP connection. Each HTTP request over the TCP connection may be made immediately without waiting for the previous response. Responses may come back in any order. This fixes the head-of-line blocking problem in HTTP 1.x.
- Data compression of HTTP headers allows reducing the payload size (HPACK). Compression helps to multiplex, because requests are smaller. This enables clients to make many requests in their first packets on a connection, while TCP flow control windows are still small.
- HTTP/2 Server Push allows the server to send resources to the client before the client requests them. It allows the server to send JavaScript or CSS files to the client with the page, before the client parsed the page and request these files.
Depending on the server you use, the procedure to enable HTTP/2 is different:
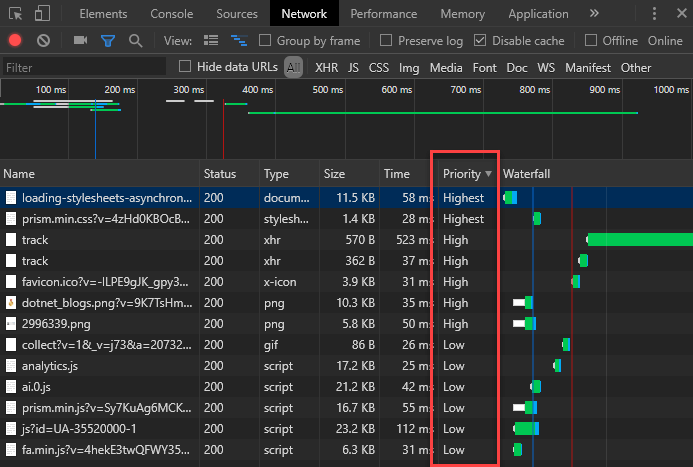
You can easily check the server is well configured using the Developer tools (to show the Protocol column, right-click on the header and check Protocol). The Protocol should display h2 when HTTP/2 is used:
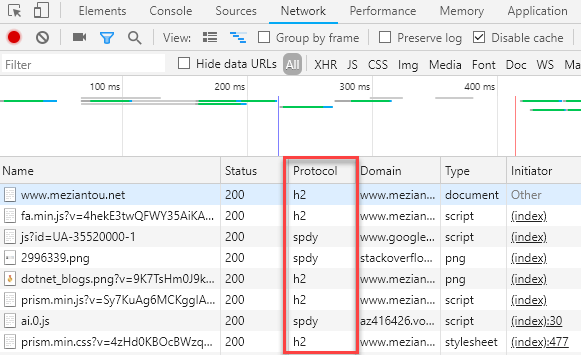 Check HTTP/2 is enabled in the Developer Tools
Additional resources about HTTP/2:
#Enable TLS 1.3
If you use HTTPS, you should consider using the latest version of TLS. The latest version of TLS, 1.3, provides more security but also better performance than its predecessors. To put it simply, with TLS 1.2, two round-trips have been needed to complete the TLS handshake. With 1.3, it requires only one round-trip, which in turn cuts the encryption latency in half.
Depending on the server you use, the procedure to enable TLS1.3 is different:
You can easily check the server is well configured using the free service provided by Qualys:
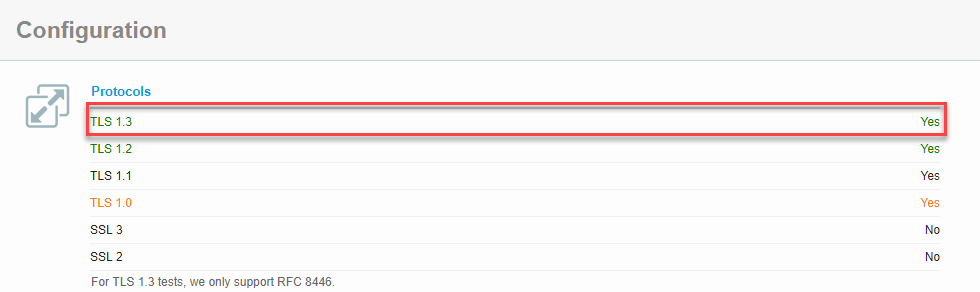 Check TLS 1.3 is enabled using Qualys
Additional resources:
#Compress responses using Brotli or gzip
The smaller the response, the faster it is to send it to the client. The easiest way to reduce the size of the response is to compress it. There are multiple compression algorithms with different characteristics. Currently, the most effective is Brotli. Brotli is well supported by recent browsers (85% of all users). However, you may also need to support older algorithms such as deflate and gzip for older clients.
Here's a list of resources to compress:
- HTML pages
- JavaScript files
- CSS files
- SVG files
- XML files such as RSS or ATOM feeds
- JSON files such as the webmanifest
- Any text-based file
You must not compress resources that are already compressed using another way. For instance, jpeg or png images are already compressed and it will just be a waste of time to recompress them. It will consume CPU resources for nothing because it won't reduce the size of the file.
How to enable Brotli compression?
You can check the server is well configured using the Developer tools (to show the Content-Encoding column, right-click on the header and check Response Headers/Content-Encoding). The Content-Encoding should display br or gzip:
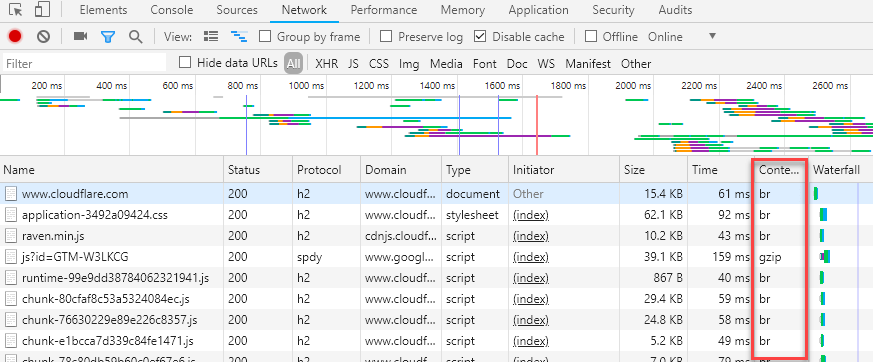 Check the response compression is enabled using Developer Tools
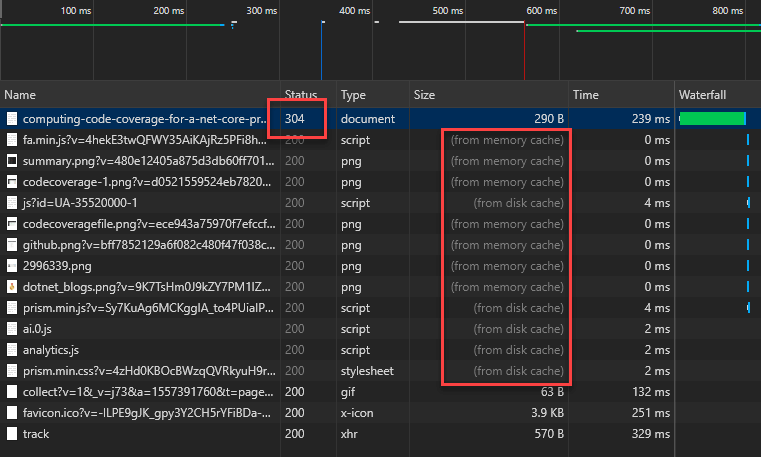
Caching static files such as CSS and JS files is essential to improve the performance of your application. Indeed, downloading the same files every time you visit a page is a waste of time and bandwidth. There are some headers to send to the client when you send the files:
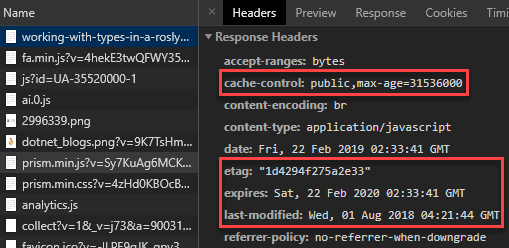
On this website, the second visit to a page is very fast because you only get a 304 (Not Modified) response from the server. So, the browser can use the cache to load the page:
#Optimize JavaScript / CSS files
##Minify JavaScript / CSS files
Minifying consists of reducing the size of the JavaScript and Stylesheet files by removing comments, spaces, merging CSS rules, using shorthand properties, shortening variable/function names, replacing true by !0, and lots of advanced techniques. In the end, the file size is reduced, so the time to download and parse it is reduced.
Here're some tools to minify CSS and JS files:
##Bundle JavaScript / CSS files
Bundling files consists of merging multiple files into one. This reduces the number of files to download to render the page. However, you should think about what you want to bundle to efficiently load the page. For instance, you can bundle the CSS files that are required to render the page, and create other bundles with the stylesheets that are less important to lazy load them, or a bundle for a specific page. For instance, on this blog the CSS file for the syntax highlighting of code blocks is lazy loaded as it is not required to render the page. It just enhances the user experience.
Here're some tools to bundle CSS and JS files:
##Async / Defer script
JavaScript files can block the parsing / rendering of a page. You can use the attributes async or defer to avoid blocking the rendering.
<script>: block the parsing of the DOM, and execute the script<script defer>: will download the script in the background and execute it once downloaded (useful for scripts such as Google Analytics)<script async>: will download the script in the background and execute it after the DOM parsing
There are very few reasons to not use defer or async such as using document.write in the JS file (documentation).
##Lazy load CSS
Some of your CSS is mandatory to display correctly your website. But some parts may not be necessary immediately or is just a small enhancement. For instance, you don't need to download the CSS of a modal until the user opens it. In this case, you could load the content and the style of the modal only when the user opens it the first time. This way the loading of the main page is faster but the loading of the modal may be slower. You could also load the stylesheet asynchronously when the main page is loaded. Unless the user clicks very fast on the button that displays the modal, they should not experience any latency.
First, you need to define your bundles as described in the previous section. Then, you need to include a small JavaScript snippet as described in a previous post:
HTML
<noscript id="render-onload">
    <link rel="stylesheet" href="/css/prism.min.css" />
</noscript>
<script>
    var renderOnLoad = function() {
        var e = document.getElementById('render-onload');
        var n = document.createElement('div');
        n.innerHTML = e.textContent;
        document.body.appendChild(n);
        e.parentElement.removeChild(e)
    };

    if(window.requestAnimationFrame) {
        window.requestAnimationFrame(function() { window.setTimeout(renderOnLoad, 0); })
    } else {
        window.addEventListener('load', renderOnLoad);
    }
</script>
##Inline JavaScript / CSS
If the CSS or JS files are very small, you can consider embedding them in the page. This way you can avoid one network call but there are some drawbacks. First, the resource won't be cacheable. This means it will be downloaded every time.
##Remove unused CSS rules
It's very common to have unused CSS rules on a website. Having unused CSS rules is not a good thing because:
- It increases the size of the CSS file, so it increases the loading time
- It increases the time needed to parse the file by the browser
- It increases the time needed to find matching rules for an element
- It increases the RAM necessary to keep the data in memory. Don't forget about green computing!
- It increases the quantity of code you have to maintain
The first step is to remove old vendor prefixes. For instance, the -webkit-transition prefix was required for Safari 6, a very old browser, so you can safely remove it and reduce the file size. You can check on CanIUse whether the prefix is required for the browsers you want to support. Or you can use autoprefixer to update your CSS file to support the browsers you want. It will automatically add or remove prefixes as needed.
Then, you should remove unneeded properties. For instance, lots of people use reset.css or normalize.css to override the default values of each browser. Nowadays, the default values are almost the same, and you can reduce the size of this file to only a few rules. As with prefixes, you can generate the normalize.css file you need using postCSS Normalize. It will prefix your stylesheet with the required rules for the list of browsers you want to support.
The next way to optimize your stylesheet is to reduce the specificity of the rules. It is not uncommon to use LESS or SASS. Using these languages, it is common to nest rules. It's a nice way to group rules for a component. However, the generated code may not be optimal. The specificity is often much higher than needed. You can use the following website to graph the specificity of your stylesheet. Using this graph you can detect rules with high specificity. Looking at the spikes gives you a good indication of which rules to check.
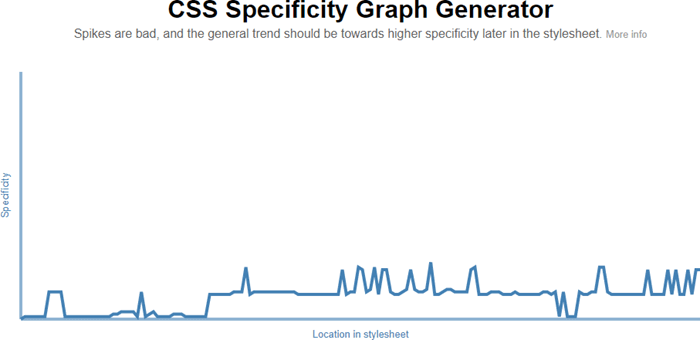 CSS specificity graph
The last step is to remove unused CSS rules. Detecting unused CSS rules is not easy. It's not uncommon to add or remove class dynamically using a JS script. So, it's very hard to determine if a rule is unused. UnCSS is a tool that removes unused CSS from your stylesheets. It works across multiple files and supports JavaScript-injected CSS.
Also, you can use the code coverage tool of the Chrome Developer Tools. It checks the page and indicates which lines of the JS and CSS are used on the current page. It also gives you a quick overview of the unused percentage of code for each file.
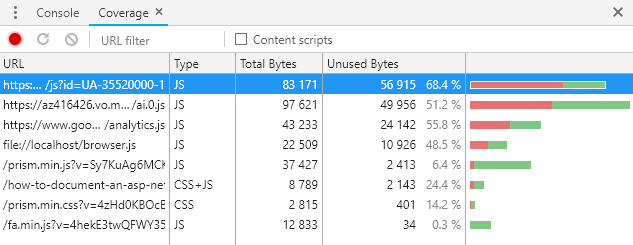 Chrome Developer tools - Code Coverage
Here're some tools to remove unused CSS rules:
#Reduce the number of redirections
##Redirect directly to the final destination
You should avoid too many redirections. A redirection requires an additional round-trip to get the actual page, increasing both render time and the number of requests the server must handle. However, there are many cases where redirections are necessary. For instance, you may want to redirect to https or add/remove www. The best practice is to always redirect to the final address in a single step. For instance, if you request http://example.com, the server should redirect directly to https://www.example.com. Many servers first redirect to https and then redirect to www, forcing the client to follow 2 redirections instead of 1, which increases the time needed to reach the actual page.
##Use canonical instead of a redirection
In some cases, you could also replace the redirection with a canonical header or tag on the page (<link rel="canonical" href="https://example.com/page1" />). In this case, search engines will index the page correctly, and users avoid one redirection. If you want the user to see the expected URL, you can rewrite the URL using the history API.
JavaScript
(function () {
    if (window && window.history && window.history.replaceState) {
        var canonical = document.querySelector("link[rel=canonical]"); // Get the canonical url
        if (canonical && canonical.getAttribute("href")) {
            try {
                // Rewrite the current url without redirection
                window.history.replaceState(null, document.title, canonical.getAttribute("href") + window.location.hash);
            } catch (e) {
                // Nothing to do here
            }
        }
    }
})();
##Use HSTS (HTTP Strict Transport Security)
HTTP Strict Transport Security (HSTS) is a web security policy mechanism that helps protect websites against protocol downgrade attacks. It allows web servers to declare that browsers should interact with them using only secure HTTPS connections.
If a user navigates to your website using http, the browser will automatically rewrite the request using https before sending it to the server. So, you may avoid one round-trip to redirect from http to https. This is also a good security practice.
To enable HSTS, you need to add the following header to the response:
Strict-Transport-Security: max-age=31536000
#Optimize images
##Choose the right format
Images are surely the most expensive resources on your web pages. Compressing images is not the same as compressing text files such as JavaScript files. When you compress a text file, you cannot lose any information. Your JavaScript file may not be valid anymore if even a single character changes after decompression. An image, on the other hand, is still valid and looks almost the same if some pixels change. That is why some formats provide lossy compression to increase the compression ratio. This means you have to find a good compromise between size and quality. There are multiple file formats with different characteristics:
- PNG: lossless compression format, support transparency
- APNG: lossless compression format, support transparency and animation (not supported on Edge)
- JPEG: lossy compression format, should drastically reduce the size of the file but you'll also decrease the quality.
- WEBP: lossy or lossless compression format (not supported on Safari), that supports animations, and provides better compression ratio than JPEG or PNG.
- AVIF: lossy or lossless format that supports transparency and provides better compression ratio than JPEG, PNG, or WEBP.
- GIF: Support animations but the compression is not good.
- SVG: vector image format. Usually provides a very small file for simple images.
Here're the steps to do:
- First, you should use a tool to compress images in place without changing the format
- Then, you should consider the most adapted file format to reduce the file size
- Also, you should consider replacing gif files with something else such as mpeg4 which provides a much better compression ratio and very good support: Using ffmpeg
- If possible, you should consider using CSS instead of images. CSS effects (gradients, shadows, etc.) and CSS animations can be used to produce resolution-independent assets that always look sharp at every resolution and zoom level, often at a fraction of the bytes required by an image file. CSS can be very powerful.
- if one image takes time to load completely, you can change the mode from interlaced to progressive to provide a better UX during loading: Progressive Image Rendering
For more information about optimizing images, you can read the ultimate guide: https://images.guide/.
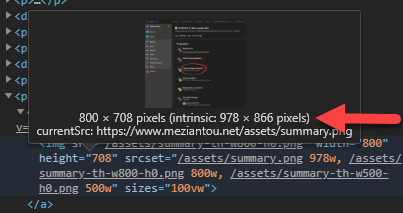
##Use the right image size
Compressing images is important, but there is no point serving a 2000px-wide image to a visitor on a mobile phone. It is important to serve an image that matches the rendering size. In the dev tools of Google Chrome, you can see when an image is not displayed at its natural size:
You can generate one image per common resolution and serve the right one. You can take advantage of the srcset attribute to do that:
HTML
<img sizes="(min-width: 40em) 80vw, 100vw"
     srcset="image-medium.jpg 375w,
             image-large.jpg 480w,
             image-extralarge.jpg 768w" />
Tools like gulp-responsive or responsive-images-generator can help automate the process of converting an image into multiple formats. There are also image CDNs which let you generate multiple versions, either when you upload an image, or request it from your page.
##Use Web Fonts for icons
If you are using many small images to display icons, you should consider using a web font. Web fonts enable the use of beautiful typefaces while preserving the ability to resize text, which is a significant improvement for accessibility. For instance, FontAwesome provides thousands of icons and is used on millions of websites (including this one). Instead of downloading many small images, you download a single font that contains all the vector icons. Also, if you use a widely used font served from a CDN, there is a good chance the font is already cached before the user's first visit.
##Minify FontAwesome
FontAwesome contains thousands of icons, but you often use a very small subset. For instance, I only use 15 icons on this website. So why should your visitors download hundreds of icons they will never use? One solution is to create a custom bundle that contains only the icons you use. You can reduce the bundle size from a few hundred kB to a few kB (6 kB on this website).
There are multiple ways to create custom bundles:
##Lazy load images
Images are not useful until they enter the viewport, so it is a waste of time to load them as soon as the user opens the page. This is why lazy loading was introduced. There are multiple ways to lazy load images. You can see this old post to see how to implement lazy loading in JavaScript: Optimize the loading of images on a website.
But nowadays, it is possible to get this for free (at least on Chromium-based browsers) using the loading attribute:
HTML
<img src="sample.jpg" loading="lazy" />
Here're some resources about this feature:
#Move your servers near your visitors (GeoDNS, CDN)
The greater the distance between the client and your server, the longer the roundtrip time is. 50% of your 1-second page load time budget on mobile is taken up by network latency overhead (a portion of which is running a DNS lookup). Source
Using Google Analytics or Application Insights, you can see where your visitors come from. For instance, on this website, most visitors are from North America, so I moved my server there. If you have visitors from all around the world, ideally you should use multiple datacenters. This can be complicated, especially if your application relies on a database or services that are hard to distribute across multiple datacenters. It also increases hosting costs. If you can use multiple datacenters, you need to use a Geo-DNS to return the IP address of the closest datacenter to each user.
If your website is serving lots of static files (css, js, images), you can use a CDN to serve them. A CDN provides the following advantages:
- Reducing response times: CDNs have servers distributed around the world, so there is probably a server close to the user.
- Reducing download time: Files used by multiple sites using the same CDN will only be downloaded once. Then they will be placed in the cache, which avoids re-download. This is especially true for commonly used libraries such as jQuery, Bootstrap, FontAwesome, and so on.
- Reducing the number of requests on our server: it has more time to answer the "real" requests.
- Reducing the request size: the domain of the CDN is different from that of our site, the browser does not have to send the cookies of your website.
#Resource Hints: Prefetch resources
Using <link rel="preload"> or <link rel="prefetch">, browsers can be informed to prefetch resources without having to execute them, allowing fine-grained control over when and how resources are loaded. Use preload if the resource will be used on the current page. Use prefetch if the resource will be used on the next page, so the resource is downloaded with a low priority.
HTML
<link rel="prefetch" href="image.png">
<link rel="preload" href="styles.css" as="style">
Prerendering is very similar to prefetching in that it gathers resources the user may navigate to next. The difference is that prerendering renders the entire page in the background, including all assets of a document.
HTML
<link rel="prerender" href="https://www.meziantou.net">
DNS prefetching allows the browser to perform DNS lookups on a page in the background while the user is browsing:
HTML
<link rel="dns-prefetch" href="//fonts.googleapis.com">
Preconnect allows the browser to set up early connections before an HTTP request is sent to the server. This means DNS lookups, TLS negotiations, and TCP handshakes may be already done when you issue the first request to the server.
HTML
<link href="https://mycdn.com" rel="preconnect" crossorigin>
Priority Hints is a new way to inform the browser whether a resource is important. This is only supported by Google Chrome. What you need to do is add an attribute:
HTML
<img src="sample1.jpg" alt="important image" fetchpriority="high">
<img src="sample2.jpg" alt="less-important image" fetchpriority="low">
#Remove unused resources/features
It might be obvious, but you should check which resources are used on your website and remove all unused ones. Also, check whether all resources provide value. For instance, you may replace a custom font with a system font if the rendering is good enough. This removes a download and improves loading time. You should also measure which features your users actually use. For instance, if you have a carousel, how many users view multiple photos? If the feature is rarely used, you can remove it and only show the first image.
For instance, this website used to have features that nobody used, such as the archive section in the sidebar. Instead, I added an entry in the top menu to navigate to a dedicated page. This way you don't download useless HTML when displaying a post. I also removed the custom fonts because they weren't noticeably different from the native ones. Note that if you use a custom font, you should specify font-display: swap; or font-display: optional; (more information about these options).
##Replace social buttons scripts with static links
Social buttons are very common. Most providers ask you to download their scripts to add the button to your page. The more buttons you add, the heavier the page becomes. You can replace these buttons with simple HTML links, as done on this website. This greatly improves loading time and user experience.

HTML
<!-- Replace {0}, {1} and {2} by the page url, page title, and author -->
<div class="social">
    <a href="https://www.facebook.com/sharer/sharer.php?u={0}&t={1}" target="_blank" rel="noopener noreferrer" class="social-facebook"><i class="fab fa-facebook-f"></i></a>
    <a href="https://twitter.com/intent/tweet?source={0}&text={1}&via={2}" target="_blank" rel="noopener noreferrer" class="social-twitter"><i class="fab fa-twitter"></i></a>
    <a href="https://www.linkedin.com/shareArticle?url={0}&title={1}" target="_blank" rel="noopener noreferrer" class="social-linkedin"><i class="fab fa-linkedin-in"></i></a>
    <a href="https://reddit.com/submit?url={0}" target="_blank" rel="noopener noreferrer" class="social-reddit"><i class="fab fa-reddit-alien"></i></a>
    <a href="https://www.digg.com/submit?url={0}" target="_blank" rel="noopener noreferrer" class="social-digg"><i class="fab fa-digg"></i></a>
</div>
CSS
.social a {
  width: 30px;
  height: 30px;
  display: inline-block;
  color: #fff;
  padding: 8px 0;
  text-align: center;
  border-radius: 15px;
}

.social-facebook { background-color: #3B5998; }
.social-twitter { background-color: #55acee; }
.social-linkedin { background-color: #0077b5; }
.social-reddit { background-color: #FF5700; }
.social-digg { background-color: #005be2; }
#Minify HTML
As for JavaScript or CSS, it's possible to minify HTML. The specification indicates clearly which tags are optional or also when you can remove quotes around attribute values. You can also remove some useless whitespaces, attributes, or comments. According to the tests made by Mads Kristensen, minification will provide an additional 6-16% lower file size with GZip enabled.
There are multiple tools to minify HTML files:
#Optimize JavaScript code
There are multiple ways to improve the dynamic parts of your site. Here're a few things that may help, but there are lots more to do depending on the framework you use:
- Remove dependencies that do not provide enough value
- Use new API:
- Use native functions/types instead of coding them (
Array.map, new Map(), etc.) - Use vanilla JS if possible
- Avoid Force layout/reflow: On Layout & Web performance
- etc.
#Automate almost everything!
You can use plugins to apply the most common optimization rules in just a few minutes. Maybe some optimizations are not as good as if you did it using other tools, but it's always better than doing nothing.
There are also lots of plugins for WordPress, but as I don't use it, I cannot advise the best ones.
Do you have a question or a suggestion about this post? Contact me!